As businesses and organizations move towards digital document management, Adobe Acrobat has become an essential tool for professionals who deal with PDFs.
One of the most important aspects of document creation is the font style and size, which can greatly affect the readability and overall aesthetic of the document. Add font to adobe acrobat pro dc offers a wide range of fonts, but sometimes, users may require a specific font not already available in the software.
In such cases, adding a custom font to Acrobat Pro DC becomes necessary. You don’t have to worry if you find yourself in this situation. Adding a font to Adobe Acrobat Pro DC is a simple process that can be done in just a few easy steps. We will provide you with a comprehensive step on adding a custom font to your Adobe Acrobat Pro DC software.
How To Add Font To Adobe Acrobat Pro Dc
When modifying the font in Adobe Acrobat Pro DC, you can do so effortlessly by following a few straightforward steps. Changing or adding fonts in Adobe Acrobat Pro DC is a simple process that can help you customize your documents and make them more visually appealing. Add font to adobe acrobat pro dc. Here’s how to do it:
Step 1. Open A PDF
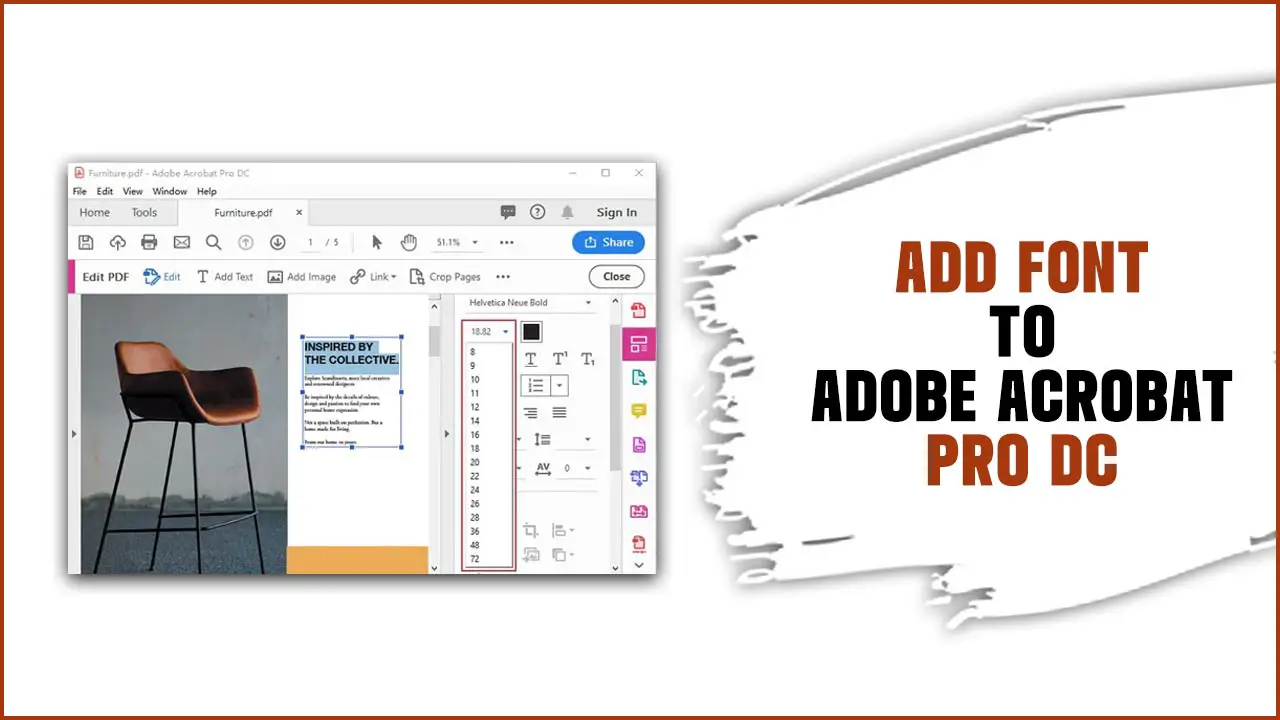
To add a font to Adobe Acrobat Pro DC, you must first open the PDF document you want to edit. Once the document is open, go to the “Tools” menu and select “Edit PDF.” This will open the editing toolbar on the right side of the screen. From there, click the “Add Text” button and click anywhere on the document where you want to add text.
A text box will appear, allowing you to type your desired text. To change the font, size, or other formatting options, simply select the text and use the options available in the toolbar at the top of the screen. Once you have made all your desired changes, save the document by going to “File” and selecting “Save.” Your added font should now be visible in Adobe Acrobat Pro DC.
Step 2. Enter Editing Mode
To enter editing mode in Adobe Acrobat Pro DC, simply open the software and the PDF document you wish to edit. In the right pane, locate and click on the “Edit PDF” tool to begin making changes. Within this mode, you can select and modify the existing text or insert new text boxes using the “Add Text” tool in the toolbar.
For further customization, navigate to the “Format” tab in the right pane. Here, you can select fonts from the available options or, if desired, add additional fonts by accessing the “Add Fonts” function at the dropdown menu’s base.
Step 3. Select The Text To Be Modified

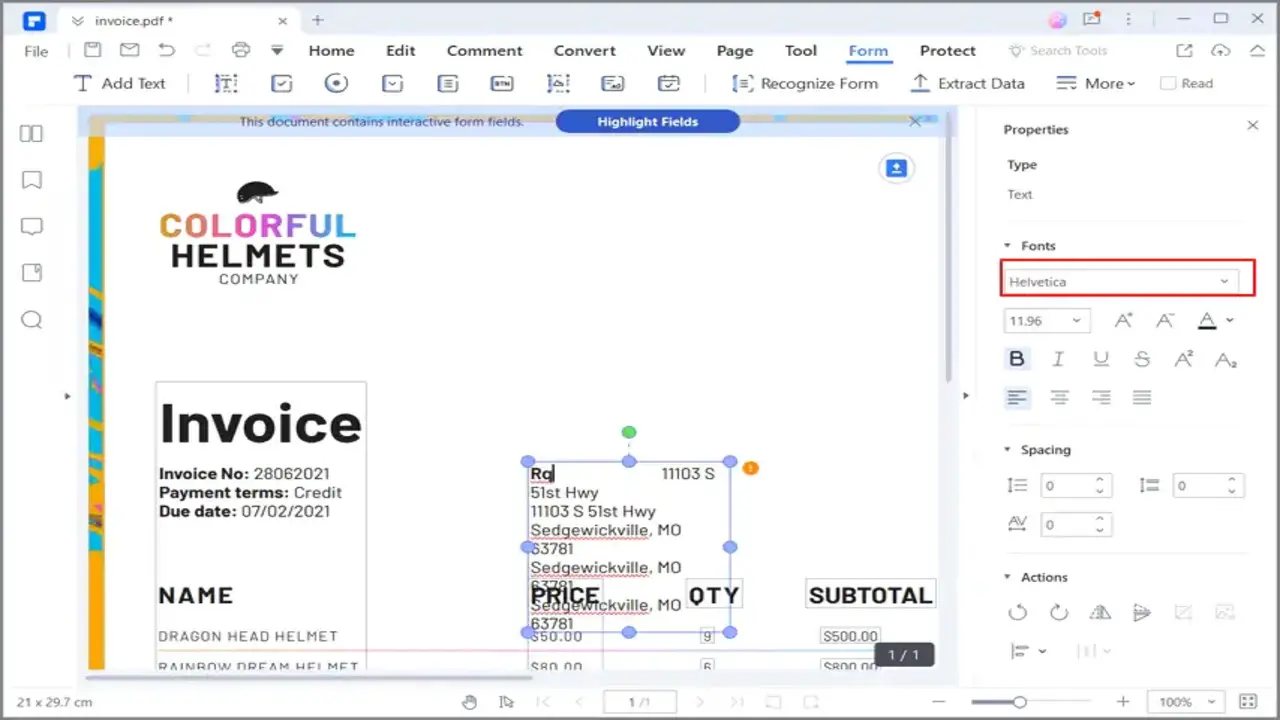
Adding a font to your document in Adobe Acrobat Pro DC is simple. First, open the document in which you want to modify the text. Next, select the specific text that you want to change by highlighting it with your cursor. Once the text is selected, navigate to the “Format” tab in the toolbar and click “Font.”
A drop-down menu will appear, displaying all of the available fonts. Scroll through the options and select the desired font for your text. The selected font will then be applied to the highlighted text in your document.
Step 4. Change Font In PDF
To change the font in a PDF using Adobe Acrobat Pro DC, follow these simple steps. First, open the PDF document in Adobe Acrobat Pro DC and click on the “Edit PDF” tool in the right pane. Next, select the text you want to modify and go to the “Format” tab.
Choose the “Font” option and select the desired font from the dropdown menu in the Font Properties panel. You can also adjust other formatting options, such as font size, color, and style. With Adobe Acrobat Pro DC, you can control the fonts in your PDF for a more customized look.
Step 5. Select Target Font
Follow these steps to select a target font in Adobe Acrobat Pro DC. Start by opening Adobe Acrobat Pro DC and going to the “Edit” tab. Then, click “Add Text” in the toolbar and highlight the text where you want to add a new font.
In the format panel on the right sidebar of the interface, you’ll find a drop-down menu next to “Font.” From there, you can scroll through the list of available fonts or click “More Fonts” to access additional options. Choose the font that suits your needs and apply it to the selected text.
How To Use Adobe Acrobat Alternative To Change Font In PDF
To modify the font in a PDF using an alternative to Adobe Acrobat, you need to follow a few simple steps. Begin by downloading and installing a font management tool like Adobe Acrobat Alternative. Once installed, open the PDF file within the alternative tool.
Select the text you want to change and navigate to the toolbar, where you will find the “Font” dropdown menu. From the available options, choose your desired font, making sure it complements the overall aesthetics of your document. Feel free to customize the font size, color, and other formatting elements per your requirements. Finally, save the PDF with the new font for a visually appealing presentation.
Conclusion
Add font to adobe acrobat pro dc can be useful for professionals who work with PDF files regularly. With the step above, you can easily add any new font to the application and have it available in your PDFs. Following these simple steps, you can enhance your PDF documents with unique and professional fonts that help you stand out.
Taking the time to learn how to add fonts to Adobe Acrobat Pro DC is a small investment that can greatly impact the quality of your work and make your PDF documents more visually appealing.
Frequently Asked Questions
How Do I Import Fonts Into Adobe Acrobat Pro DC?
To import fonts into Adobe Acrobat Pro DC, Open the program and go to the “Edit” tab. Activate the editing mode by selecting “Edit Text & Images.” Click on the desired text box, then choose “Add Fonts” from the formatting toolbar. Find the font file on your computer (.ttf or .otf) and install it by clicking “Open”. The font will now be accessible for use in your document.
How Do I Manually Add Fonts To Adobe?
To manually add fonts to Adobe, download and extract the font files. In Adobe Acrobat Pro DC, go to “Edit” > “Preferences” > “Page Display”. Under the “Rendering” tab, click on “Add Fonts”, select the extracted font files, and click “OK” to add them.
How Do I Install Missing Fonts In Adobe DC?
To install missing fonts in Adobe Acrobat Pro DC, open the software and navigate to the “Edit” tab. From there, click on “Preferences” and go to “Page Display.” In the “Rendering” section, enable “Use local fonts.” To add a missing font, click on “Add Font,” locate the font file on your computer, and select it. Finally, click “Open” to install the Adobe Acrobat Pro DC font.
How Do I Use Activated Fonts In Adobe Acrobat DC?
To utilize activated fonts in Adobe Acrobat DC, begin by installing the fonts on your computer. Then, open Adobe Acrobat DC, go to “Edit” > “Preferences” > “Content Editing.” In the Content Editing preferences, click “Font Options” and enable the system fonts option. This will enable you to use the activated fonts in your PDF files.
What Are The Benefits Of Adding A Custom Font To Adobe Acrobat Pro Dc?
dding a custom font to Adobe Acrobat Pro DC offers the advantage of maintaining brand consistency in PDF documents. It provides design flexibility, enhances readability, and creates visually appealing and unique documents that leave a lasting impression on readers.


![How To Customize Your Powershell Font Face And Size – [Step By Step]](https://fontsaga.com/wp-content/uploads/2023/04/How-To-Customize-Your-Powershell-Font-Face-And-Size-768x432.jpg)
![How To Customize Your Powershell Font Face And Size – [Step By Step]](https://fontsaga.com/wp-content/uploads/2023/04/How-To-Customize-Your-Powershell-Font-Face-And-Size-300x169.jpg)


Leave a Comment