The default font for iOS devices is San Francisco, which was introduced with the release of iOS 9. This font was specifically designed for Apple’s operating system and is optimized for legibility on small screens.
Designing with iOS Custom Fonts is a great way to make your app stand out. Designing an iOS app can be challenging, but with the right tools and knowledge, it can be a rewarding experience. With custom fonts, you can create a unique look and feel for your app that matches your brand or style.
We will guide you through designing with iOS custom fonts and show you how easy it is to start. However, we will cover all aspects of using custom fonts, including downloading them, adding them to your XCode project, using them in Interface Builder, and coding with UI Font.
We will also help you troubleshoot any issues and guide you in choosing the right font for your app. So, let’s dive in and explore the world of iOS custom fonts.
How To Designing With iOS Custom Fonts
Designing with iOS custom fonts can add a unique touch to your app’s visual aesthetic. To get started, you’ll need to choose a custom font that complements your app’s design and messaging. Once you’ve selected a font, you can download it from a source like Google Fonts or Font Squirrel, then add it to your Xcode project.
To use the custom font in your app, you’ll need to specify its name in your code. You can do this by creating a new UIFont object and setting its name property to the name of the custom font. Then, assign the new UIFont object to any UILabels or UITextViews in your app that you want to display the custom font.
It’s important to remember that not all iOS users will have the custom font installed on their device. So it’s a good idea to include fallback fonts in case the custom font is unavailable. Test your app thoroughly on different devices and screen sizes to ensure the custom font looks great across all platforms.
Creating An Asset Catalog File
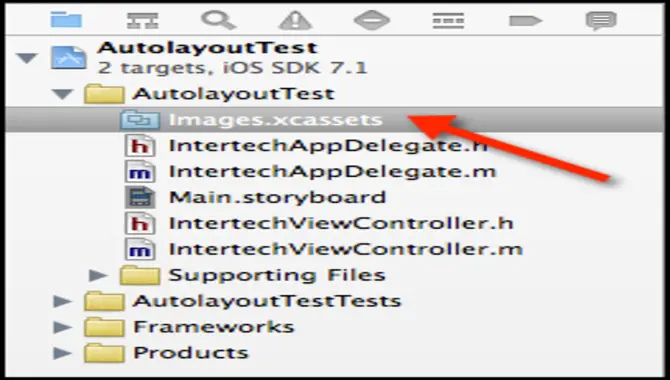
Creating an Asset Catalog File is a crucial step in developing iOS apps. This file contains all the images and icons used in the app, making it easy for developers to manage and organize them. The process of creating an Asset Catalog File is straightforward.
First, open Xcode and create a new project or select an existing one. Then, navigate to the Assets. cassettes folder in the project navigator, and click the plus icon to add a new asset catalog file. From there, you can add individual image sets for each type of image or icon used in the app.
It is important to name each set appropriately and include images in both 1x and 2x resolutions to ensure optimal display on different devices. Once you add all the sets, you can easily access them throughout the app using their respective names. By creating an Asset Catalog File, developers can streamline their workflow and ensure consistency in the visual elements of their app.
Adding Fonts To The Asset Catalog File
To successfully manage and use custom fonts on your iOS app’s interfaces, adding them to the Asset Catalog is essential. You can drag and drop the font file into the designated area or add multiple versions for consistency across your app. Custom fonts help create a unique brand identity for your iOS application.
So download new fonts from Google Fonts or FontSpace, or select from Apple’s Pages and Keynote default font families. Experimenting with third-party apps like Font Diner or Adobe Creative Cloud could work wonders!
Downloading Custom Fonts On iOS
To get unique fonts on iOS, always download from reliable sources and confirm that the font files are in the right format before installing them on your iPad or iPhone. IOS has a font management system that simplifies installation. However, incorporating custom fonts into XCode involves additional steps like generating an.
Asset Catalog file and referencing the font name within your app’s code or Interface Builder. Using distinctive typography helps set your app apart and build brand identity. Explore different third-party apps like Adobe Creative Cloud or Google Fonts for freestyles to personalize your app.
Adding Fonts To Your Xcode Project
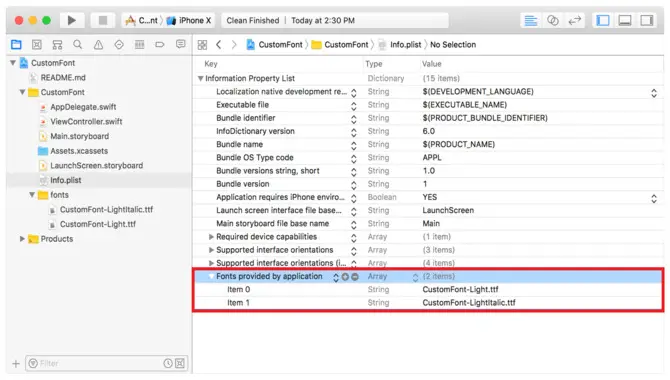
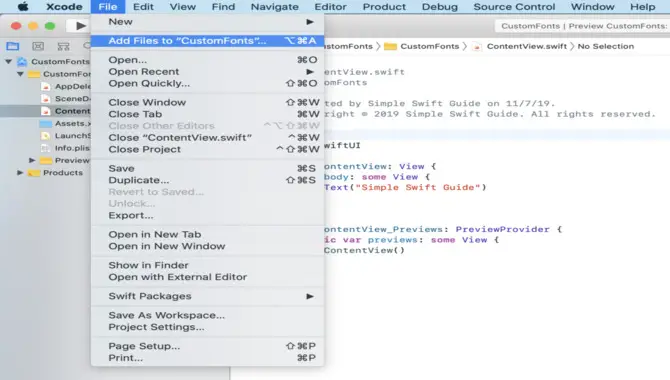
Adding fonts to your Xcode project is a simple and effective way to give your app a unique look and feel. The first step is to download the font file you want to use and add it to your Xcode project. Once you have added the font file, specify the font name in your app’s Info.
List file. To do this, simply open the Info. List file, add a new key called “Fonts provided by application,” and then add the name of the font file under that key. Finally, you can use the new font in your app by specifying its name in your code or Interface Builder. Adding custom fonts gives your app a personalized touch that will help it stand out from the crowd.
Using Custom Fonts In Interface Builder

Custom fonts in Interface Builder can be a great way to add a unique and personalized touch to your iOS app. You must download the font file and add it to your Xcode project to get started. Once the font file is added, you can select and apply it to any text element in Interface Builder.
Select the text element, navigate the font dropdown menu, and choose your custom font from the list. It’s important to note that not all fonts are suitable for use in an app, so be sure to test your custom font on various devices and screen sizes before finalizing your design.
With a little experimentation and some careful consideration, you can create a truly one-of-a-kind user interface for your iOS app using custom fonts in Interface Builder.
Using Custom Fonts In Code With Uifont

To enhance the visual appeal of your IOS application, consider using custom fonts; this can make it stand out from others on the App Store. A wide range of custom fonts are available on IOS, or you could opt for third-party services like FontSpace or Google Fonts.
Once you’ve downloaded or created a new font, add its font files to your XCode project, updating your app’s Info. plist file with its name. A simple method to implement these fonts is using UIFont class in your app’s code to access them smoothly. Remember that when working with custom fonts, ensure they’re readable and legible for users.
Troubleshooting iOS Custom Fonts
When developing an iOS app with a custom font like the ones provided in Google Fonts or Font Diner, it’s crucial to follow some troubleshooting steps. These include checking if the custom font has been added to your project’s Info.plist file correctly and verifying its inclusion in the app bundle.
It’s also essential to use the exact font name and style when referencing it while incorporating other third-party fonts like Adobe Creative Cloud or FontSpace. Debugging any issues with your custom font by reviewing system logs or using Xcode’s debugging tools is another critical step to consider.
How To Choose The Right iOS Custom Font For Your App
When choosing a custom font for your iOS app, several factors must be considered. First and foremost, you want to ensure that the font you choose is legible and easy to read on various screen sizes. It’s also important to consider your app’s overall look and feel and how the font fits in with your design aesthetic.
Identify your brand’s personality and voice to choose the right custom font for your iOS app. Do you want to convey a sense of professionalism or playfulness? Once you have a clear idea of your brand’s tone, look for fonts that align with those qualities.
It’s also important to consider the typefaces used in other parts of your app, such as headings and body text. You want to choose a custom font that complements these existing typefaces and creates a cohesive visual experience for users. Finally, don’t be afraid to test different custom fonts before making a final decision. Ask for feedback from colleagues or beta testers and adjust until you find the perfect fit for your iOS app.
Conclusion
Custom fonts can be a game-changer when designing iOS apps. Fonts are a great way to add a unique touch to your iOS app design. With so many options available, choosing the right one for your project can be overwhelming. But don’t worry.
Designing with iOS custom fonts is easier than you think. They help make your app stand out and offer a unique experience to the user. You can easily implement custom fonts in your app design with the tips and tricks mentioned.
We’ve covered everything from downloading custom fonts on iOS to using them in code with UIFont. However, choosing the right font for your app is important to ensure readability and consistency throughout the design. If you want to learn more about how to incorporate custom fonts into your iOS app, be sure to check out our resources on iOS custom font.
Frequently Asked Questions
Where Can You Use Custom Fonts On iOS?
Custom fonts can be utilized in iOS apps like Keynote, Pages, and Numbers. Developers can use frameworks to add custom fonts to their apps. Users can install and utilize custom fonts from third-party sources in supported applications.
How Do I Add Fonts To My Font App?
To add fonts to your font app, download or purchase them and use third-party software or the app’s instructions. Check the license agreements and choose wisely, as too many fonts can slow down performance.
What If You Need To Use A Custom Font?
If you want to use a unique font in your IOS app, you can add it by incorporating the font file into your Xcode project and including it in the Info list file. Then you can designate the font’s name and style in code or Interface Builder. Ensure proper licensing for any custom fonts used.
Where Can We Find Custom Fonts?
Custom fonts are available on sites like Font Squirrel, Google, and Adobe Fonts. Designers may offer them directly from their sites. Paid services like MyFonts and Creative Market sell a range of custom fonts. Design software like Adobe Photoshop also has pre-installed options.
Is The Font File’s Target Membership Set To The App?
When incorporating it into the Xcode project, it is important to ensure that the font file’s target membership is set to the app. This can be done by selecting the font file within Xcode and checking its target membership in the File Inspector.

David Egee, the visionary Founder of FontSaga, is renowned for his font expertise and mentorship in online communities. With over 12 years of formal font review experience and study of 400+ fonts, David blends reviews with educational content and scripting skills. Armed with a Bachelor’s Degree in Graphic Design and a Master’s in Typography and Type Design from California State University, David’s journey from freelance lettering artist to font Specialist and then the FontSaga’s inception reflects his commitment to typography excellence.
In the context of font reviews, David specializes in creative typography for logo design and lettering. He aims to provide a diverse range of content and resources to cater to a broad audience. His passion for typography shines through in every aspect of FontSaga, inspiring creativity and fostering a deeper appreciation for the art of lettering and calligraphy.
