Windows 10 has a font folder where all the installed fonts are stored. This folder is in the Windows directory, typically found in the C drive. To access the font folder, open File Explorer and navigate to C:\Windows\Fonts.
You will find all the fonts currently installed on your computer in this folder. From here, you can view and manage your fonts by installing or removing new ones.
Here we will demystify the Windows 10 Font Folder and provide you with all the essential knowledge you need. We will show you how to easily find stored fonts, copy and install fonts from other folders, create shortcuts for quick access, and even share a keyboard shortcut to make your font directory easily accessible.
Say goodbye to font frustrations and unlock the full potential of your Windows 10 font library with our expert tips and tricks.
Essential Knowledge Windows 10 Font Folder
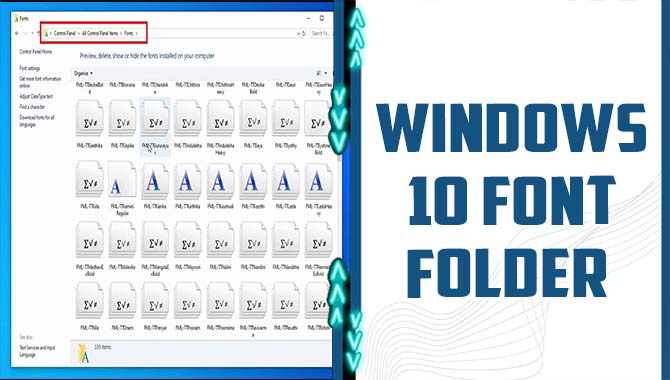
The Windows 10 font folder stores all the fonts installed on your computer. It can be accessed by navigating to the “Fonts” folder in the Control Panel. The font folder in Windows 10 is the central location for storing all the fonts installed on your computer. This folder, accessible through the Control Panel, helps you manage and customize the fonts available on your PC.
Adding new fonts is as easy as dragging and dropping the font files into the font folder. You can also uninstall or disable fonts from this folder if they are no longer needed. It is crucial to exercise caution while making changes to the font folder as it can impact the way text appears in different applications and documents.
How To Find Stored Fonts In Windows 11 And 10
To find stored fonts in Windows 11 and Windows 10, there are several methods you can try. One method is to access the font folder by searching for “Fonts” in the Control Panel. This will allow you to view and manage all the installed fonts on your computer.
Another way is to open File Explorer and navigate to C:\Windows\Fonts. This will directly take you to the font folder. From here, you can easily install new fonts by dragging and dropping them into the folder or using the “Install” option in the right-click menu. However, it’s important to exercise caution when adding fonts from external sources to avoid potential malware or compatibility issues.
Copying A Font To Install From Another Folder
To install a font in Windows 10, you can conveniently copy the font file to the Fonts folder in the Windows directory (C:\Windows\Fonts). Another way to access the Fonts folder is through the Control Panel, specifically Appearance and Personalization, and then clicking on Fonts.
When copying a font file to the Fonts folder, ensure it is either a TrueType (.ttf) or an OpenType (.otf) format. Once the font file is copied, it becomes readily available in applications supporting custom fonts like word processors or graphic design software. It is essential to verify the compatibility and authenticity of fonts from other folders to avoid any potential issues.
Creating A Shortcut For The Windows 11 / 10 Font Folder

Streamline your font management process by creating a shortcut to the Windows font folder. This handy shortcut lets you easily access your installed fonts with just a click, eliminating the need to navigate multiple folders. To create the shortcut, simply right-click on your desktop or taskbar, select “New,” and choose “Shortcut.
” Enter “%windir%\Fonts” in the location field and give your shortcut a name. Now, with a simple double-click on the shortcut icon, you can instantly open the font folder and access all your installed fonts. Save time and elevate your design workflow by using this convenient feature.
The Keyboard Shortcut For Fast Access To The Font Directory
To swiftly access the Font Directory in Windows 10, take advantage of a handy keyboard shortcut. By simply pressing the “Windows key + R,” you can quickly open the Run dialogue box. In the dialogue box, enter “fonts” and hit Enter to unlock the Font folder.
This directory grants access to your installed fonts for seamless management and viewing. Want to install or uninstall fonts? No problem. Need to organize your font library? This folder has got you covered. Be mindful when deleting fonts; certain system fonts are critical to proper OS functioning.
Conclusion
The Windows 10 font folder may seem mysterious initially, but with the right knowledge and understanding, it becomes an essential tool for managing and installing fonts on your system.
Whether you need to find stored fonts, copy and install fonts from another folder, or create shortcuts for quick access, knowing how to navigate the font folder is crucial. Installing fonts in Windows 11 and Windows 10 can be a bit challenging, but with the necessary requirements and steps, you can easily enhance your typography experience.
Whether you’re a graphic designer or enjoy experimenting with different fonts, the Windows 10 fonts folder has something for everyone. So go ahead and explore the possibilities – you’ll be amazed at how a simple change in font can transform the look and feel of your digital creations
Frequently Asked Questions
1.Where Is The Font Folder Located?
Ans: In Windows 10, the font folder is located in C:\Windows\Fonts. To access it, open File Explorer and go to the C drive, Windows, and the Fonts folder. You can also search for “fonts” in the Start menu search bar and select “Fonts” from the results.
2.How Do I Restore My Font Folder In Windows 10?
Ans: To recover your font folder in Windows 10, utilize the System Restore feature. Access it through the Control Panel by searching for “System.” Choose a restore point predating the deletion or modification of the font folder.
3.Does Windows 10 Have A Font Manager?
Ans: Yes, Windows 10 includes a convenient font manager that enables users to view, install, uninstall, and organize fonts. To access it, simply search for “Font Settings” in the Start menu.
4.Where Is The Font Folder In Windows 10 And Windows 11?
Ans: In Windows 10, you can find the font folder in the Control Panel by searching for “Fonts.” In Windows 11, access it through the Settings app under “Personalization” and “Fonts.” Both operating systems also have a system font folder in the Windows directory.
5.Where Do I Find Ttf Files, Fonts Folder Win 10 And Windows 11?
Ans: In Windows 10, you can locate ttf files in the Fonts folder in the Control Panel under Appearance and Personalization. In Windows 11, ttf files are in the Fonts folder within the Settings app under Personalization.

David Egee, the visionary Founder of FontSaga, is renowned for his font expertise and mentorship in online communities. With over 12 years of formal font review experience and study of 400+ fonts, David blends reviews with educational content and scripting skills. Armed with a Bachelor’s Degree in Graphic Design and a Master’s in Typography and Type Design from California State University, David’s journey from freelance lettering artist to font Specialist and then the FontSaga’s inception reflects his commitment to typography excellence.
In the context of font reviews, David specializes in creative typography for logo design and lettering. He aims to provide a diverse range of content and resources to cater to a broad audience. His passion for typography shines through in every aspect of FontSaga, inspiring creativity and fostering a deeper appreciation for the art of lettering and calligraphy.